
Introducing Trinity-RFT
Published:
这篇文章主要是介绍一个 LLM 的 RL 训练框架 Trinity-RFT ,内容主要分为框架介绍和使用指南两部分。更详细的介绍可以参考文档。注:本文所有图片都来自 Trinity-RFT 团队[1]。
框架介绍
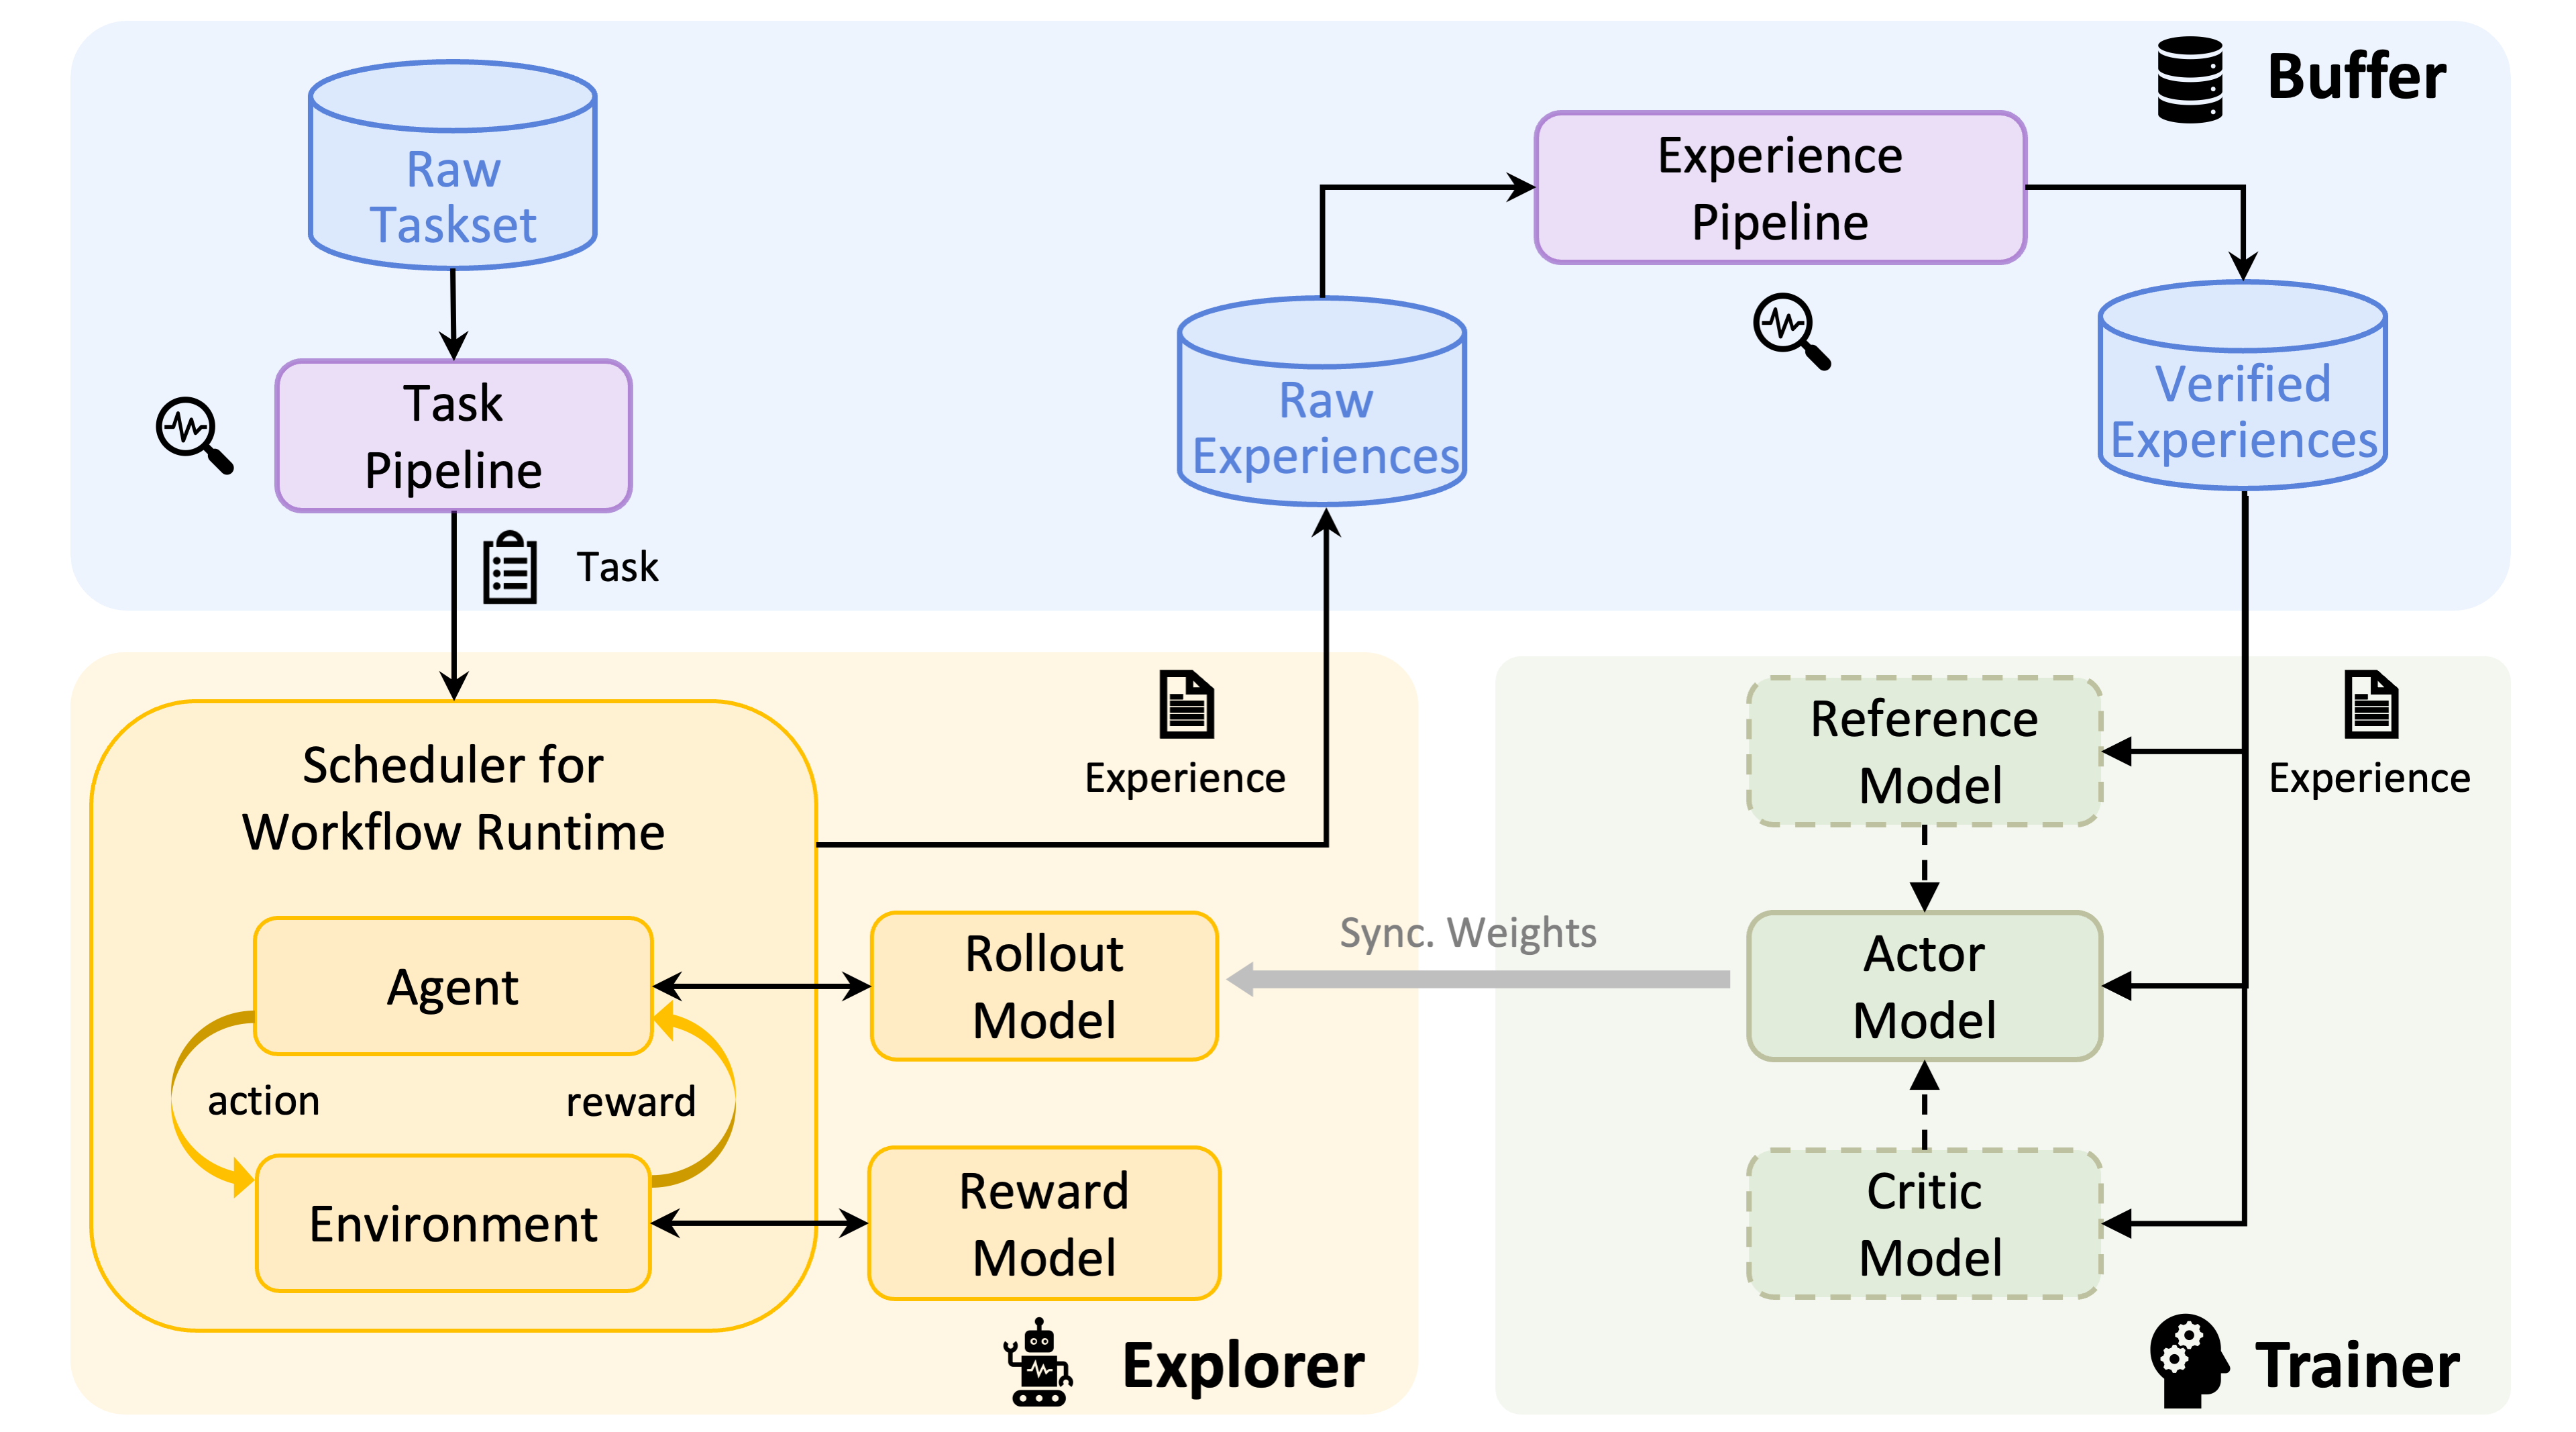
Trinity-RFT 框架的核心设计是 explorer、 trainer和buffer三个模块解耦但是协同工作,这种“三位一体”的结构也是框架名称 Trinity 的由来。简单来说,explorer 负责探索任务(task)产生经验(experience),trainer 负责训练模型,buffer 负责存储和处理数据(task 和 experience)。 这种解耦的设计使得框架具有很好的灵活性和可扩展性,也使得 Trinity-RFT 拥有了下面两个“beyond normal on-policy training”的特点:
Trainer/Explorer 的灵活调度
Trinity-RFT 的 trainer 和 explorer 是两个独立的模块,它们各自占一部分 GPU,这样的设计使我们可以灵活调度两部分模块,trainer 不必等待 explorer 产生新 experiences 也可以继续用之前的 experiences 进行训练,一个简单的设想是:当 explorer 产生 experience 的速度等于 trainer 消耗 experience 的速度时,我们可以实现效率最大化。
Trinity-RFT 提供了多种调度策略,由一个 synchronizer 负责,简单可以概括为以下几种:
- 完全同步(On-policy and synchronous):trainer 和 explorer 每步进行一次更新,每次都使用最新的 experience 进行训练。
- 周期性同步:trainer 和 explorer 每隔一定步数进行一次同步,每次都使用最新的 experience 进行训练。
- 💡 One-step off-policy:trainer 和 explorer 每步进行一次更新,但 explorer 总是比 trainer 快一步,这样 trainer 一直在用 off-policy 程度为 1 的 experiences 进行训练。[注]
- 完全异步(Fully asynchronous):trainer 和 explorer 完全独立,trainer 拿来训练的 experiences 只由 sample 策略决定。
还有一个比较好玩的场景是,多个 explorers 产生 experiences,一个 trainer 进行训练,这种设定为 scale up 提供了新的维度。
注:在早期 RL 训练工作中,大家经常强调 on-policy training 的重要性,但近期也有工作表明(懒得找参考文献了),off-policy training 也可以获得很好的效果,也就是说产生 experience 的模型和正在训练的模型可能不完全相同。实验中也发现 one-step off-policy training 可以获得很好的效果。我个人对于 off-policy training 的看法是:一个好的 RL 算法应该有足够的 robustness 来应对不严重的 off-policy 差异。

全生命周期的 data pipeline
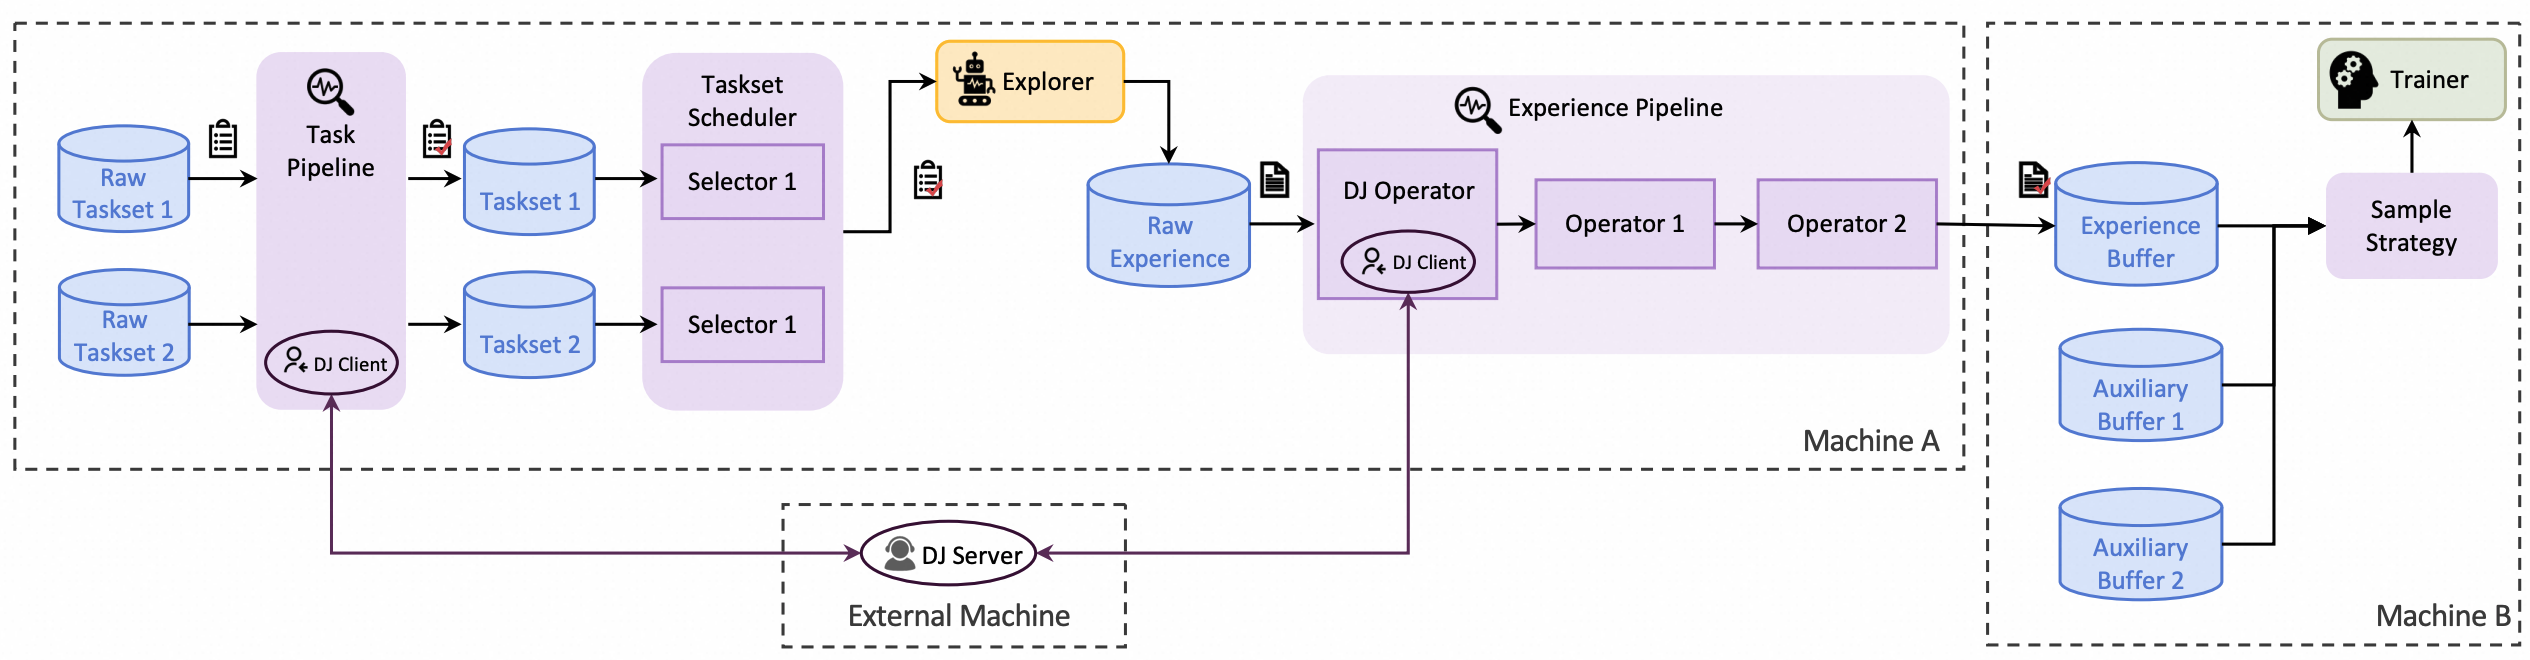
数据(不管是 task 还是 experience)是 RL 训练的基石,这一点应该所有人都同意。为了保证数据的质量,Trinity-RFT 提供了全生命周期的 data pipeline,从 task 的生成到 experience 的消耗。这个东西到底是干什么的呢?你可以理解为框架在每个卡点都设置了数据操作的钩子,你可以在这些钩子上做一些数据处理的操作,比如:
- Explorer 使用哪些 tasks 进行训练,可以设置
task_selector.selector_type,简单的有随机采样(random),根据困难度采样(difficulty)等。 - Explorer 对产生的 experiences 做后处理,可以设置
ExperienceOperator,比如筛选掉一组 advantage 相同的 experiences,或者只保留正样本/负样本,甚至叠加多个 operators。 - Trainer 使用哪些 experiences 进行训练,可以设置
algorithm.sample_strategy,包括控制 off-policy 程度,采样比例等。
基本上就是所有卡点都提供了数据处理的接口,让你可以灵活地处理数据。
使用指南
写到这里我发现上面的介绍实在是过于抽象,下面我用几个具体的例子来介绍一下如何使用 Trinity-RFT。
假如你想实现一个新的环境
新环境的核心肯定是 agent-environment 的交互,这部分代码需要在 workflow 中实现。以 Alfworld(一个模拟日常生活中的各种操作任务的虚拟环境) 为例, StepWiseAlfworldWorkflow 类实现了一个基于 Alfworld 的交互环境。首先,在 __init__ 方法中,我们定义了环境的一些参数,并且调用 self._setup_environment() 方法来初始化环境。因为这个任务很容易被拆解为多步任务,我们只需要实现每一步的交互逻辑,也就是 step 方法:
 def step(self, step_num: int) -> bool:
    if self.done:
        return False

    # Format observation for the model
    format_obs = format_observation(self.observation)  # type: ignore
    self.memory.append({"role": "user", "content": format_obs})

    # Get action from the model
    # 这里可以用 chat/chat_async,也可以用 openai 的 api 来实现
    responses = self.model.chat(self.memory)
    response_text = responses[0].response_text
    self.memory.append({"role": "assistant", "content": response_text})
    action = parse_action(response_text)

    # Execute action in the environment
    observation, reward, done, info = self.env.step(action)

    # Update internal state and reward
    self.observation = observation
    self.done = done
    if self.done:
        self.final_reward = reward

    # Return False to stop the run if the episode is done
    return not self.done
当你定义好了 step 方法后,框架其实为你包装好了产生 experience 的逻辑,定义在 run 方法中,你也可以自己修改。其实这个交互逻辑是很灵活的,你可以控制每一次 rollout 返回的 experiences,比如只返回最后一条 experience,或者返回拼接的 experience (AlfworldWorkflow)。
假如你想实现一个新的训练算法
和环境交互不同的是,算法其实更容易拆成多个模块,比如 “advantage_fn”, “policy_loss_fn”, “sample_strategy”, “kl_loss_fn”, “entropy_loss_fn” 等,还有前面提到的数据处理的 operators。一般来说,这些模块是可以像搭积木一样组合使用的,这样的高度灵活对于算法设计者是非常友好的。举个例子,比如你想要试试 CISPO 算法 [4],它和 GRPO 算法在实现上唯一的区别就是 policy loss 的计算方式,你只需要实现 CISPOPolicyLossFn 类,继承自 PolicyLossFn 类,并且实现 __call__ 方法:
class CISPOPolicyLossFn(PolicyLossFn):
    def __init__(
        self,
        backend: str = "verl",
        clip_range_low: float = 1.0,
        clip_range_high: float = 0.28,
        enable_mask_clip: bool = False,
        mask_clip_range_low: float = 1.0,
        mask_clip_range_high: float = 0.28,
        loss_agg_mode: str = "token-mean",
    ) -> None:
        # omitted
        pass

    def __call__(  # type: ignore
        self,
        logprob: torch.Tensor,
        old_logprob: torch.Tensor,
        action_mask: torch.Tensor,
        advantages: torch.Tensor,
        **kwargs,
    ) -> Tuple[torch.Tensor, Dict]:
        negative_approx_kl = logprob - old_logprob
        ratio = torch.exp(negative_approx_kl)
        ppo_kl = masked_mean(-negative_approx_kl, action_mask)
        ratio_clamped = torch.clamp(
            ratio, min=1.0 - self.clip_range_low, max=1.0 + self.clip_range_high
        )

        # mask = 0 if ratio > 1.0 + self.clip_range_high and advantages > 0
        # mask = 0 if ratio < 1.0 - self.clip_range_low and advantages < 0
        # else 1
        mask = torch.ones_like(ratio)
        if self.enable_mask_clip:
            mask = torch.where(
                (ratio > 1.0 + self.mask_clip_range_high) & (advantages > 0),
                torch.zeros_like(ratio),
                mask,
            )
            mask = torch.where(
                (ratio < 1.0 - self.mask_clip_range_low) & (advantages < 0),
                torch.zeros_like(ratio),
                mask,
            )

        cispo_loss = -advantages * ratio_clamped.detach() * mask.detach() * logprob

        loss = aggregate_loss(cispo_loss, action_mask, loss_agg_mode=self.loss_agg_mode)
        unmasked_frac = masked_mean(mask, action_mask)

        metrics = {
            "cispo_loss": loss.detach().item(),
            "ppo_kl": ppo_kl.detach().item(),
            "unmasked_frac": unmasked_frac.detach().item(),
        }

        return loss, metrics
记得在algorithm/policy_loss_fn/__init__.py中注册这个类:
POLICY_LOSS_FN: Registry = Registry(
    "policy_loss_fn",
    default_mapping={
        "cispo": "trinity.algorithm.policy_loss_fn.cispo_policy_loss.CISPOPolicyLossFn",
    },
)
之后,当你想要切换到这种 policy loss 计算方式时,只需要在配置文件中填写algorithm.policy_loss_fn=cispo即可。
另外,框架也包装好了很多常见的训练算法,比如 PPO, GRPO, RLOO, REINFORCE++, etc. 你只需要在配置文件中填写algorithm.algorithm_type=ppo即可。
总结
Trinity-RFT 是一个灵活程度很高的框架,尤其是我个人很喜欢这种可以任意搭积木的特性(ablation 也很方便)。框架本身还在发展中,希望可以有更多的研究者来使用和提反馈(issues)。也希望我在 2026 年也可以多写一些博客,分享相关的使用经验。
[1] Trinity-RFT: A General-Purpose and Unified Framework for Reinforcement Fine-Tuning of Large Language Models. https://arxiv.org/pdf/2505.17826
[2] MiniMax-M1: Scaling Test-Time Compute Efficiently with Lightning Attention. https://arxiv.org/pdf/2506.13585